Monday, April 13, 2009

the good stuff

Recently, I was testing projects from a kid's book on being an "eco hero" for work.  The book had plenty of interesting 'green' facts, motivating reasons to change your lifestyle, and practical ways of doing things to be healthier and greener.  One of the projects had natural food dye as an ingredient in a play dough, so off I went to Whole Foods to purchase some.  Yikes!!!  3 little vials for $20!  What?!  Who would...!? Why are they...?!  The colors were very pretty, like easter eggs only maybe a little brighter.  Now, the idea of naturally colored playdough is really in line with my philosophy, so I'm not sure why I've never thought to make them before.  I don't want my darlings eating artificial colors - I mean, where do they go once they are in there?  I see nothing blue coming out the far end, right?  Turns out (after a little tinkering), making natural playdough can be simple and beautiful AND CHEAP!  Here is a recipe:

1 cup flour
1 cup brightly colored juice (blueberry, cherry, pomengranate, grape, etc.)
1/4 cup salt
1/2 teaspoon vegetable oil
1/4 teaspoon cream of tartar

Put all ingredients in a pot and cook over medium heat, stirring constantly until the dough comes together.  This only takes a few minutes.  When cool enough to handle, squish and knead until smooth.  Voila.  Store in a container in the fridge.


A lovely yellow can be made by using the recipe above, replacing the juice with water, and adding a teaspoon of ground turmeric.

Update:  I just made a chocolatey brown using, you guessed it, cocoa.  Follow the turmeric version, but add 4 Tablespoons of cocoa in the turmeric's place.  It smells good, looks just like cookie dough for your young pretend bakers, but is too salty to eat!  A great addition to the above palette.

What's not to feel good about when you hand this over to those little lovelies?


Wednesday, April 8, 2009

My Linen Bag


I am excited to share this bag because I LOVE IT!  I've been thinking of a bag like this for a while now, with some fabulous Japanese sewing book in the back of my mind as inspiration.  It is a tote with some angles and my new silk screen design and sturdy over stitching in a turquoisey blue.  Here,  see what I mean.

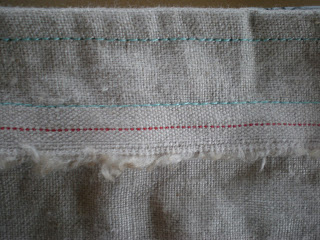
I kept the selvage edge as it came, frayed but unable to fray any further, with a red thread running across.  How could I hide it!?


And the straps are roughly stitched in an intentional sort of way, adding what I think is an interesting detail, but also makes this bag so easy to make without a pattern or fuss, not to mention making it strong and sturdy.


I think I have come to sewing in the right era.  The art of designing things is more fluid and open ended- sort of an anything goes philosophy.  My dear friend's mother, who has a beautiful and magical touch with the things she makes, says that what you sew should be able to be worn inside out because it should be that well finished.  That is the era she was reared in with her sewing machine or needle and thread.  I would have run away screaming, it is so diametrically opposed to how I am able and willing to do things.  I want things finished nicely, I do, but my self-imposed rules are quite a bit different.  I like raw edges.  I like my stitching to show.  I like to take what could be a mistake and turn into into a cool detail.  I am not always successful with what might be a willy nilly approach, but when it works, even I love it.  The rest is chalked up to the learning process, which has it's good points.  I do love to sew!

I am going to make some more bags like this one and sell them in my ETSY shop.  Just click on My Etsy Shop above and see what I have there.  I am always making new things, so keep checking.  

I am thrilled to announce that The Crafty Crow is posting my Spring Birdy project, as seen in my last posting.  I hope it is my first of many on that fabulous site.  Let me know what you think of the tutorial and if it is clear.

Sunday, April 5, 2009

a spring bird

Today I revisited a project that I made over a year ago for Family Fun Magazine for their April issue called "We Love Baby Animals".  I actually made quite a few of these birds and they live in our Christmas ornament box until it's time to adorn the tree.  Today's birdy went home with our friend Birdy (I couldn't resist, and she was so gracious and fun to give it to).   Here she is in her lavender fluffiness:

This project is super easy and satisfying.  I developed it to be made with styrofoam balls, and that is what I did today, but I would like to change that to something less creepy to work with and that won't stick around forever in a landfill (if the bird doesn't get handed down through the generations, that is).  A friend suggested paper mache balls, which are available ready-made at the craft store, so I think I'll give them a try.  The nice thing about styrofoam is that the yarn grabs at the roughness and makes the wrapping easy.  The only nice thing about styrofoam.

I hope the following tutorial is clear and everyone makes lots of spring birds.  I do love that image.


These spring babies are a quick and satisfying project to do with your kids.  You’ll want to make a whole flock.


Materials:

-        2 styrofoam balls of differing sizes.  This babe was made with 2.5” and 1.5” balls.

-        fuzzy yarn

-        craft feathers

-        felt for the beak

-        2 black beads for the eyes

-        a pipe cleaner

-        tacky glue

-        a branch

 Directions:

1)     Coat half of the bigger ball in tacky glue.  At one end, begin spiraling the yarn around and around in a circle until you reach the equator of the ball (It is tricky to wrap the ball with yarn as the diameter is decreasing, as the yarn slips).  Cut yarn and repeat process on the other side.


2)     Repeat with smaller ball then attach the 2 balls together by inserting the toothpick into one and sliding the other on top.


3)     Cut the felt into a diamond shape, fold it in half so it is beaky, and glue in place along the crease.  Glue on bead eyes.


  4) To make the feet, cut pipe cleaner in half and bend one end into 3 toes.  Cut the leg to desired length and insert into bottom of bird body.  You may need to poke a pilot hole with a skewer first.  Secure with glue if desired. 


5) Put a few drops of glue on one end of the stick and begin wrapping with yarn.  Wrap the whole branch and secure other end with a dot of glue.  Glue birdy to the branch a prop to dry. 


Oh, here is another one I have in a shadow box in my kitchen with an abandoned nest on top.

Tweeeeeeet!

Thursday, April 2, 2009

winter weeds and screen printing

I finally did it. I sat down over coffee with a couple of friends, took out my Winter Weed Finder by Dorcas S. Miller (illustrated by Ellen Amendolara, bless her) and drew several things, including a wild leek that I successfully made into a silk screen (only successful on the second attempt, but successful, just the same). I have been wanting to silk screen forever. I even bought all the supplies a couple months ago, but that first drawing felt so important to get right that I was immobilized for a good while. When I finally decided to not take myself so seriously, I drew the picture (so simple) and then proceeded to attempt using the photo emulsion method (which required going to the copy shop to make a transparency, allowing the photo emulsion to dry on the screen in the dark of my closet, away from the exposing effects of the big bad sun for so long it seemed like I'd never again be able to change my clothes without considering what to grab before opening and slamming the door shut again...phew...story not over. Then came the burning of the image under the brightest lights I could find in the basement, which apparently, were not bright enough). Basically, on that first pass of ink onto paper, came a solid swath of blackness. No image. Hmm. I decided to use the drawing fluid method and it worked great.

Silk screening is magical. The print looks so much cooler than the drawing and as long as you have things to print, you can keep going and going. Here are some things that I made after printing thrifted t-shirts. First is a skirt that was a 2xl super wide men's shirt. It was wide enought to make a lovely a-line. I printed the image several times along the bottom and used fold over elastic to make the waistband. Pretty. Comfy. Kinda my perfect everday skirt.

The next project was a large red thrifted t-shirt where I silk screened one image onto the chest. I turned this into a little swing dress/ tunic for Ava. She even modeled it for me in Cowboy boots! For those of you who know her, this may be a surprise. It is even more of a surprise that she asked to keep it instead of allowing me to put it in my ETSY shop. Sure!


Well!