

Art + Craft + Sewing + Cider + Family + Food + Other Bits and Bobs
Friday, October 28, 2011
my girl


Monday, October 17, 2011
Mason Jar Pendants
I use mason jars a lot, and I know I am not alone in the world now or back in the day. We drink out of them, burn candles in them, dip paint brushes in them, and preserve food in them. They are just so darn useful and they are pretty. So yesterday, we made them into pendant lights for our dinner table and I couldn't be happier (well, I could be a little happier with the cords they dangle from, but the kit was given to us out of my Mom's attic, so...)
Our IKEA pendants were beginning to break and look yucky so we switched it our for this. Nice, huh!
 Currently, there is a different sized jar on each light, but my husband prefers the little half pint jars. They can be switched out by unscrewing the lids, and then screwing different jars on. Maybe I'll even tint some for fun.

 Right now, we are using a piece of cardboard that I cut a hole in for the lid, but we will swapping them out with actual mason jar lids that are drilled today or tomorrow (or in a few years). I keep checking the cardboard, and it isn't hot at all. Still, just in case.
 This really could not have been easier. And, I LOVE IT!
Our IKEA pendants were beginning to break and look yucky so we switched it our for this. Nice, huh!


Tuesday, September 27, 2011
pretty pink cashmere cardi

For those of you who haven't had a chance to look at Debra Immergut's and my new blog, Improv Diary, head over for a very easy tutorial on making the above cardigan. It took me 15 minutes to make out of something I simply never would have worn otherwise. It is very pink and pretty.
Thursday, September 22, 2011
two bits of news
I have two fun things for you to look at today, if you have a minute. The first is over at Sew Mama Sew, where I am a guest blogger and have posted a great little hooded tunic project for you to make. You can even see me modeling as a coy little riding hood type, only with more "facial character", if you know what I mean. Oh well. Age smage.
The other things is this: Debra Immergut- my pal and co-author and senior editor at Family Fun Magazine (so often she is my boss too)- and I have started up a new blog called Improv Diary. It is really new and just has a few posts currently, but keep checking in. It will be a great extension of our forthcoming book with Storey, called Improv Sewing: 101 Fast and Fearless Projects (May 2012). We will post thoughts and tutorials and things we like that express our love of the improvised and the creativity that comes from freeing yourself up to work with what you've got. And, Debra is a great writer and simply a pleasure to read.
The other things is this: Debra Immergut- my pal and co-author and senior editor at Family Fun Magazine (so often she is my boss too)- and I have started up a new blog called Improv Diary. It is really new and just has a few posts currently, but keep checking in. It will be a great extension of our forthcoming book with Storey, called Improv Sewing: 101 Fast and Fearless Projects (May 2012). We will post thoughts and tutorials and things we like that express our love of the improvised and the creativity that comes from freeing yourself up to work with what you've got. And, Debra is a great writer and simply a pleasure to read.
Tuesday, September 20, 2011
I actually *HEART* polymer clay
As a Family Fun Magazine craft developer, I have had plenty of opportunities to handle all of the crafting superstars- pom poms, pipe cleaners, puffy paint, felt and craft foam (I do not heart craft foam). The material I have been most surprised about loving, however, is polymer clay- brands like FIMO and Sculpey, you know the stuff. It is so easy to make cool things out of it and if you have an extractor fan, you can ignore the fact that it is a plastic and probably not actually a good thing for the air quality of your home when your baking it (or outside, when it is extracted). So, ignoring that successfully, I would like to show you this lovely cuff I made. I also made a little itty bitty pendant for my boy to wear at school so when he is sad (and he has been sad) he can look at the back where it says, "we love you". He says it looks like I bought it at a store. Charmer.

Wrist Cuff Tutorial
What you'll need:
- polymer clay in a color you like
- a rubber stamp you like a lot too
- acrylic paint
- foam brush or paint brush
- cloth or paper towel
- oven
Directions:
1. Take a chunk of polymer clay from the pack and roll it out with a rolling pin or jar. You want it to be pretty thin to achieve the flexibility needed for a cuff. Let's say, 1/8". I worked atop parchment paper so it was really easy to lift it off when the time came.


2. Measure your wrist and then cut the clay so it will wrap around your wrist and leave about 3/4". I used a ruler and a craft knife for a nice clean line.

3. Gently peel the rectangle off the parchment so the shape doesn't get deformed and wrap it around a toilet paper tube. Gently press it so it is secure-ish against the cardboard.

4. Following the manufacturer's instructions, bake your cuff. I took mine out a few minutes early to ensure it stayed nice and flexible.

5. When it is done and cool, apply acrylic paint all over the stamped area and then wipe off excess so it just stays in the impressions.


Friday, September 9, 2011
Back to School Pencil Case
I have always thought that the best thing about starting school are the new school supplies. I'm sure I'm not alone. Right before the start of the year, Ava had her 12th birthday party and since she only wanted to have 4 kids I thought it would be fun to make the goody bags more functional than years past. And, since the theme of her party was "Japanese cute", these little binder pencil cases were perfect. I swear they didn't take long, and besides, Ava helped me and we got to really hang out before she headed off to middle school. So. Much. Fun. Ava drew the little cute characters and I cut and sewed them up.

 2) Fold the vinyl in half, sandwiching the little piece of art in the middle. Smooth out any bubbles and insert cut edge of vinyl into the canvas strip that has been pressed in half. One side of the velcro strip (it doesn't matter if it is the loops or the fuzzy side) will be sewn onto the back of the canvas strip.
note: I find pins get in the way, so I am just careful and sew this together without them.


 5) Using a zig zag stitch and starting at an edge with velco, sew around the three raw sides of the pouch. Be sure to backstitch at the beginning and the end.


Tutorial
back to school pencil cases
What you'll need:
- cotton canvas
- velcro
- vinyl
- contrasting thread
- grommets (and a grommet setter)
- some art
Directions:
1) Cut your pieces.
Canvas: 5" x 8"
Vinyl: 8" x 10", then fold in half
Velcro: 7.5" x 1/2" (I cut a 1" width in half the long way)
Canvas strip: 1" x 8", the press in half long wise

note: I find pins get in the way, so I am just careful and sew this together without them.

3) Topstitch along the perimeter of the canvas strip with a small zig zag, being sure to grab the velcro into the stitch.


4) Sew the velco onto an 8" side of the backing canvas in the same manner, then press the velco sides together so they are secure.


Set your machine to a straight stretch stitch (it's a utility stitch that goes forward twice, back once, forward twice, etc.)It makes a nice bold line. Stitch right along the edge of the zig zag on the first side, about 3/4" from the closed 8" edge (this will allow space for grommets, and then back up along the edge of the zig zag on the other side. This reinforced line will make it so pencil tips don't get stuck in the zig zag stitching. The zig zag makes it unnecessary to hem, which, as you might already know, I am all about avoiding.

6) Add grommets following the manufacturers directions. They are very easy to do and the whole kit for setting them costs only a few dollars. You will need a hammer. Don't be scared off. You'll want to find loads of ways to use them because they are really quite handy.
The kids loved them and everyone got their favorite animal. We filled them with paper covered pencils (made by Ava), japanese erasers (of course), and little paper wind spinners that had their names stamped on them (Ava made them with a circle paper punch and stamps and then we sewed them together in the blink of an eye).
Thursday, August 25, 2011
wedding aprons
I was recently asked to create some aprons for the wedding of my kid's PE teacher. He is a special kind of fella and really quite a gifted educator- more environmental education than jumping jacks- and he and his gal needed them to wear while they were handing out pie to all of the guests as they arrived. Love that! He wanted some swooping swallows and hearts on the chest and a pocket for whatever one might need it for. He also wanted a shawl with the same motif for his Granny. All together, 6 aprons and the shawl. I decided to use linen and keep them very raw and they really turned out lovely, if I do say so myself.
 I thought I'd share how to make them so you can have one too.
What you'll need:
* an apron to copy
* a 1/2 yard of linen or other fabric of your choosing- anything will work
* another contrasting fabric- I used jersey cotton
* embroidery floss and needle
* contrasting thread for your machine
*an iron
Directions:
1) Fold the apron you will be tracing in half lengthwise and align the fold with your folded fabric. Use chalk to trace the shape of the apron and cut out.


 3. Cut a piece of fabric large enough to back the chalked shapes. Pin to the back of the apron.




I sewed about 6 lines across the top like this.

7. Cut a 2" wide strip of linen fabric that is long enough to go around your neck and keep the apron top falling around the collar bones. It should still be able to slip over your head without being too loose. Next, fold the strip in half lengthwise and press with a hot iron. Sew a zig zag stitch along the open edges.


8. Pin the raw ends in place so the are on the front of the apron (again, show off those raw edges!). Stitch a box with one or two diagonals for strength/


9. The waist ties are also 2" wide strips. Make them long enough to reach from your sides and tie in a bow. This is really up to you and how much fabric you have. Use your scraps if you can. I left the edges raw, of course, and zig zagged along the edges before attaching to the apron.

10. To attach ties, pin them in place where the bib panel meets the straight apron bottom. This will be obvious. Use zig zag or straight stitches- whichever you prefer (I changed it up on different aprons because I am like that) to attach the ties to the front of the apron. Just be sure to backtack so they are nice and secure.


11. Want a pocket? Yes, they are good to have. I forgot to write down my dimensions, but I rememebr them being about 7.5" x 11". Again, do what you like. Before pinning it in place, run some stitched lines or zig zags along the open edge of the pocket. Or, even better, use a selvage edge that has a nice soft fuzzy fray that is won't ravel anymore.
Center the pocket in position, pin to secure, and zig zag along the raw edges to attach it to the apron front. Next run a straight stitch (I used a strong double straight stretch stitch) 1/8" in from the zig zag. That pocket isn't going anywhere.


Look, there is my use of the selvage along the top of the pocket. Isn't that nice?


What you'll need:
* an apron to copy
* a 1/2 yard of linen or other fabric of your choosing- anything will work
* another contrasting fabric- I used jersey cotton
* embroidery floss and needle
* contrasting thread for your machine
*an iron
Directions:
1) Fold the apron you will be tracing in half lengthwise and align the fold with your folded fabric. Use chalk to trace the shape of the apron and cut out.


2. Using chalk or disappearing ink, draw or stencil your shapes to be reverse appliqued onto the desired spot. I chose the breast of the apron.


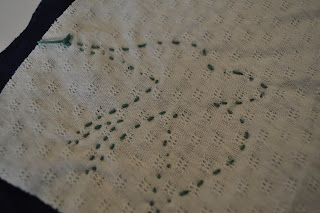
4. Thread an embroidery needle with a length of embroidery thread. I like to work with an arms length or so to keep it manageable. Tie a knot at the end and pull a stitch from the back of the apron to the front. Continue with a running stitch around the entire shape, ending with a knot to secure the thread on the backside of the apron.
.

5. To create the reverse applique, use a sharp tipped pair of scissors (embroidery scissors are perfect), and carefully cut the top layer of fabric away, about 1/16" from the embroidery thread. Cut excess backing fabric off.


6. To finish the apron, I chose not to hem or tape the edges, but thought I'd leave the edges raw. To minimize raveling (though I did want some), I sewed around the perimeter of the apron shape a few times, allowing my lines to meander a bit.


Center the pocket in position, pin to secure, and zig zag along the raw edges to attach it to the apron front. Next run a straight stitch (I used a strong double straight stretch stitch) 1/8" in from the zig zag. That pocket isn't going anywhere.


Subscribe to:
Posts (Atom)