As a Family Fun Magazine craft developer, I have had plenty of opportunities to handle all of the crafting superstars- pom poms, pipe cleaners, puffy paint, felt and craft foam (I do not heart craft foam). The material I have been most surprised about loving, however, is polymer clay- brands like FIMO and Sculpey, you know the stuff. It is so easy to make cool things out of it and if you have an extractor fan, you can ignore the fact that it is a plastic and probably not actually a good thing for the air quality of your home when your baking it (or outside, when it is extracted). So, ignoring that successfully, I would like to show you this lovely cuff I made. I also made a little itty bitty pendant for my boy to wear at school so when he is sad (and he has been sad) he can look at the back where it says, "we love you". He says it looks like I bought it at a store. Charmer.
Wrist Cuff Tutorial
What you'll need:
- polymer clay in a color you like
- a rubber stamp you like a lot too
- acrylic paint
- foam brush or paint brush
- cloth or paper towel
- oven
Directions:
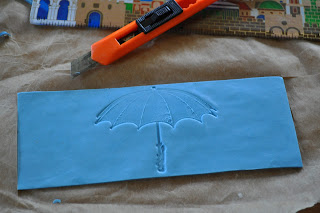
1. Take a chunk of polymer clay from the pack and roll it out with a rolling pin or jar. You want it to be pretty thin to achieve the flexibility needed for a cuff. Let's say, 1/8". I worked atop parchment paper so it was really easy to lift it off when the time came.
2. Measure your wrist and then cut the clay so it will wrap around your wrist and leave about 3/4". I used a ruler and a craft knife for a nice clean line.
3. Gently peel the rectangle off the parchment so the shape doesn't get deformed and wrap it around a toilet paper tube. Gently press it so it is secure-ish against the cardboard.
4. Following the manufacturer's instructions, bake your cuff. I took mine out a few minutes early to ensure it stayed nice and flexible.
5. When it is done and cool, apply acrylic paint all over the stamped area and then wipe off excess so it just stays in the impressions.
Isn't that really nice? It would be fantastic with stamps all over it so there is a lot of contrast, but I really like my umbrella stamp so I used that today. Make them for all your gals!


and i *HEART* this idea! i have a "flexible" polymer clay that I'm totally going to try this with! (it's sort of bendy and rubbery even after completely baked)
ReplyDeleteVery cute!! I've never actually tried polymer clay before... I'm gonna have to try this out :)
ReplyDeleteVery fun idea -I like your umbrella stamp too :)
ReplyDeleteWhat kind of polymer clay did you use? Is it flexible?
ReplyDeleteI used sculpey and I removed it from the oven slighlty early (maybe 5 minutes early) so it baked and did its thing but didn't get too rigid. There might be a flexible polymer clay on the market but I used what I had and it worked great
ReplyDeleteThanks for the tutorial 1 I tried it and was very happy with the results... Thanks again!
ReplyDeleteI am a long time Family Fun subscriber and keep thinking that I should drop the subscription because my kids are getting older. Then I see one of your faaaaabulous ideas (like your use of polymer clay) and it keeps me renewing just to see your ideas (and the travel articles). At the risk of sounding gushy - keep those great ideas coming for those who us who can create but are not naturally creative!
ReplyDelete